
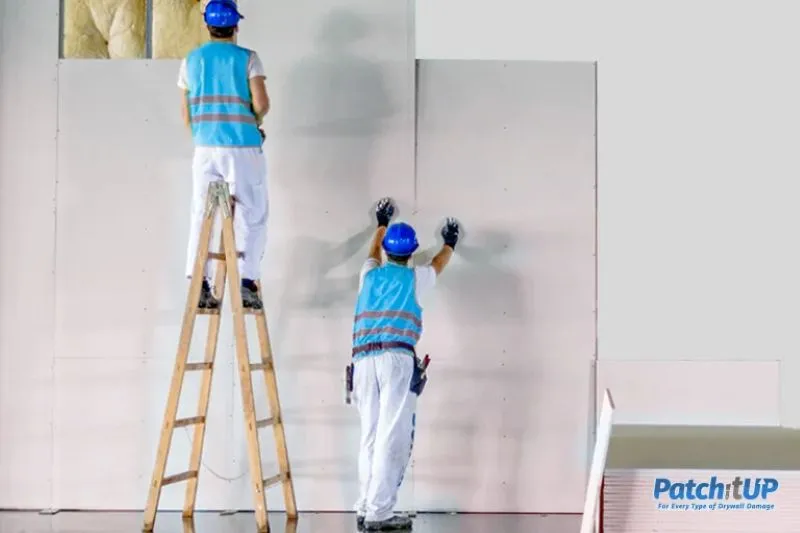
As Kelly Reynolds, I've seen countless home transformations. There's a certain magic that happens when rough framing gives way to smooth, finished walls. Drywalling might seem like a daunting task, a messy rite of passage for any serious DIYer, but let me tell you, it's one of the most rewarding aspects of any home renovation. It’s where your vision truly starts to take shape, where a house skeleton begins to feel like a home. The satisfaction of taking raw materials and sculpting them into a seamless canvas for your personal style? Unbeatable.
Drywalling is more than just slapping up sheets of gypsum; it's an art form that demands patience, precision, and a willingness to get a little dusty. But with the right approach, the proper tools, and a healthy dose of determination, you can absolutely achieve professional-looking results. Whether you're finishing a new room, patching a hole, or embarking on a full-scale remodel, understanding the fundamentals of drywall installation is crucial for success.
The Drywalling Dream: More Than Just Walls
Why bother with drywalling yourself? For many, it boils down to two key factors: cost savings and the immense pride of a job well done. Professional drywall installers can be expensive, and tackling this stage yourself can significantly reduce your overall project budget. Beyond the financial aspect, there's an inherent satisfaction in transforming a space with your own hands. These aren't just walls; they're the backdrop to your life, the foundation upon which your home's aesthetic is built. From providing fire resistance and soundproofing to creating a smooth, paint-ready surface, drywall is fundamental to a comfortable and beautiful living environment. It’s a critical step that often follows major structural or utility work. If you're tackling a larger project, like a basement renovation, the amount of drywall needed can be substantial, making DIY an even more appealing option.
Essential Prep: Laying the Foundation for Flawless Walls
Before you even think about lifting a sheet of drywall, meticulous preparation is non-negotiable. This stage is arguably as important as the installation itself. Begin by thoroughly inspecting your framing. Are the studs straight and plumb? Are the joists level? Any inconsistencies here will translate directly into problems with your finished walls. Use shims where necessary to ensure a perfectly flat surface.
Measure Twice, Cut Once (or Three Times!)
Accurate measurements are your best friend. Map out where each sheet will go, aiming to minimize cuts and waste. Remember that drywall typically comes in 4x8 or 4x12 sheets, and planning your layout can save you time and material. Consider the orientation: usually, sheets run horizontally to minimize butt joints and provide better support. This also means fewer seams to tape.
Pre-Drywall Checklist
Before the first sheet goes up, ensure all behind-the-wall work is complete and inspected. This includes electrical wiring, plumbing, and insulation. You absolutely do not want to tear down newly installed drywall to fix a leaky pipe or run a new wire. If you're uncertain about your home's waterworks, consulting a guide on mastering your home's plumbing might be a smart move before sealing up those walls.
Hanging the Boards: The Art of the Perfect Panel
Now for the main event: hanging the drywall. This is where a good partner comes in handy, especially for ceilings or larger sheets. Safety first – wear gloves and eye protection.
Tools of the Trade
- Drywall lift: Essential for ceilings.
- Utility knife: For scoring and snapping.
- T-square or straightedge: For accurate cuts.
- Drywall saw: For cutouts around outlets.
- Drywall screws: Specific length for studs/joists (typically 1-1/4 inch).
- Drywall screw gun or drill with depth-setting bit: Crucial for consistent screw depth.
- Rasp: For fine-tuning edges.
Cutting Techniques
Scoring and snapping is the most common method. Score the face paper with a utility knife and straightedge, snap the board along the score line, then cut the back paper. For irregular shapes, a drywall saw is your go-to. Remember to always cut from the finished side.
Screwing It In
Start with ceiling sheets, then walls. When hanging walls, start from the top, leaving a small gap (about 1/2 inch) from the floor to account for flooring and moisture expansion. Use drywall screws spaced every 8-12 inches along studs. The key is to drive the screw head just below the surface of the paper without tearing it. This dimple will hold the joint compound later. Never drive screws into the very edge of the board; leave about 3/8 inch from the edge to prevent crumbling. Ensure every screw hits a stud or joist for structural integrity.
Taping and Mudding: Where the Magic Happens
This is where the walls truly start to look finished. Taping and mudding (applying joint compound) is a multi-step process that requires patience and practice. Don't rush it.
The First Coat: Embedding the Tape
Apply a thin, even layer of joint compound over all seams. Immediately embed paper tape into the wet mud, pressing firmly with a 6-inch putty knife to squeeze out excess compound and air bubbles. Overlapping tape is a common mistake; ensure pieces meet flush. For inside corners, fold the tape lengthwise down the center and embed each side separately.
The Second Coat: Building Up the Surface
Once the first coat is completely dry (usually 24 hours), apply a wider, slightly thicker layer of joint compound over the tape, feathering the edges out about 8-10 inches wide. This helps to conceal the tape and start building a smooth transition. For outside corners, use metal or plastic corner bead, securing it with screws or staples, then cover it with mud.
The Third Coat: Feathering to Perfection
After the second coat dries, apply a very thin, wide final coat, feathering the edges even further, sometimes up to 12-14 inches wide. This is your chance to correct any imperfections and create an almost invisible seam. Work slowly and methodically, using a 10-12 inch trowel or drywall knife for the best results. Each coat should be progressively wider and thinner than the last. Take your time, as this step dictates the final quality of your walls.
Sanding to Perfection: The Dust-Up for a Smooth Finish
Sanding is where you truly refine your work, but it's also the messiest part. Prepare for dust, and take precautions like wearing a respirator and sealing off the room. A good air purifier can also be a lifesaver during and after this stage.
Choosing Your Sandpaper
Start with 100-120 grit sandpaper for initial smoothing. For the final pass, move to 150-grit or finer. A sanding pole with a universal head is invaluable for walls and ceilings. Use a hand sander for smaller, detailed areas.
Sanding Techniques
Sand in a circular motion with light pressure. The goal is to smooth out any ridges or imperfections from the joint compound, blending the feathered edges seamlessly into the drywall. Be careful not to over-sand, which can expose the tape or create depressions. After sanding, wipe down the walls with a damp cloth to remove all dust, which will interfere with primer adhesion.
The Finishing Line: Primer, Paint, and Pride
You're almost there! Once the walls are smooth, clean, and dust-free, it's time for priming. Primer is not just another coat of paint; it's a critical step that seals the porous drywall and joint compound, ensuring a uniform finish and better paint adhesion. Without it, your paint job can look blotchy and uneven.
Inspection and Touch-Ups
Before priming, conduct a final inspection. Use a bright work light held at an angle to highlight any remaining imperfections or un-sanded spots. Make any necessary touch-ups with a thin layer of joint compound, re-sand, and clean.
Priming for Success
Apply a high-quality drywall primer. This will equalize the porosity between the paper face of the drywall and the joint compound, preventing "flashing" (where the paint looks different over the mudded areas). Allow the primer to dry completely according to manufacturer instructions before applying your chosen paint color.
With the primer dry, your walls are now a pristine canvas, ready for the final color. Step back and admire your handiwork. From raw studs to a smooth, flawless surface, you've created something truly special.
Common Drywall Disasters (and How to Dodge Them)
Even seasoned DIYers can run into snags. Here are a few common pitfalls and how to steer clear:
- Over-sanding: Leads to exposed tape and depressions. Use lighter pressure and finer grits for final passes.
- Poor Tape Adhesion: Bubbles or peeling tape mean insufficient mud underneath or not enough pressure during embedding. Re-mud and re-tape.
- "Hills and Valleys": Uneven application of joint compound. Build up layers gradually and feather wide. Practice makes perfect.
- Not Enough Coats: Trying to finish in one or two coats will always show. Three thin coats are better than one thick, lumpy one.
- Dusty Walls Before Priming: Paint won't adhere properly. Always thoroughly clean after sanding.
When to Call in the Cavalry
While DIY drywalling is incredibly rewarding, there are times when calling a professional is the smartest move. If you're tackling a massive project with complex angles or vaulted ceilings, or if time is a critical factor, a professional can save you headaches and ensure a quicker, high-quality finish. Similarly, if you discover significant structural issues during your prep, or if you feel overwhelmed, there's no shame in seeking expert help. Sometimes, the peace of mind is worth the investment, especially when you consider the scope of your overall home renovation checklist.
Ultimately, drywalling is a skill that improves with practice. Don't be discouraged by initial imperfections. Each seam you tape, each wall you sand, will bring you closer to mastering the craft. The transformation you achieve, from a skeleton frame to a finished room, is incredibly satisfying and adds immense value to your home. So, grab your tools, embrace the dust, and get ready to create some beautiful walls!

Kelly Reynolds is a dynamic freelance writer hailing from the picturesque landscapes of Alberta. A master of the written word, she juggles her passion for storytelling with the exhilarating chaos of being a mother to five spirited children. With an impressive portfolio that spans various genres, Kelly captivates readers through her engaging blog posts and thought-provoking articles.
Related Posts
Reinventing Drywall: Modular, Smart, and Sustainable Solutions
A deep dive into modular drywall systems that cut waste, embed IoT sensors, and use recycled gypsum,... Read More
Drywall’s Quiet Revolution: Sustainable, Smart, and Ready for the Future
From recycled gypsum panels to embedded sensors and rapid‑finish tools, this guide shows how drywa... Read More
Beyond the Wall: Mastering Modern Drywall Techniques
A deep dive into contemporary drywall practices, covering eco‑friendly materials, acoustic solutio... Read More
Top Posts

The Future of Masonry: How Sustainable Solutions Are Revolutionizing the Industry
The masonry industry is undergoing a significant transformation as it shifts towards sustainable solutions. Learn about the latest developments and innovations ...Read More
Breathing Easy: Designing Homes for Superior Indoor Air Quality
This article explores why indoor air quality must be a foundational element in home construction, offering practical design tactics, smart sensor integration, a...Read More
Future‑Proofing Your Home: Construction Strategies for Aging in Place
Discover how to design and build homes that gracefully accommodate aging occupants through flexible layouts, accessible features, and sustainable materials—en...Read More
Cultivating a Sensory Garden: A Personal Journey to Outdoor Wellness
A personal guide to building a sensory garden that balances beauty, edible harvests, wildlife, and sustainable practices, turning any yard into a wellness oasis...Read More
0 Comments
Post Comment
You will need to Login or Register to comment on this post!