
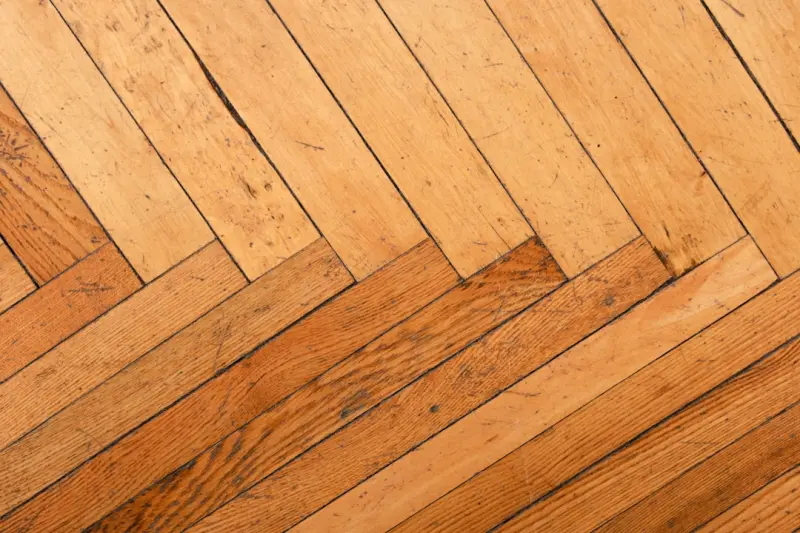
Why Original Hardwood Floors Deserve a Second Chance
When I first walked into a century‑old bungalow in my hometown, the creaking floorboards sang a story of generations. Yet, like many historic surfaces, those boards were hidden beneath carpet, dulled by years of neglect, and often dismissed as “old‑fashioned” in favor of cheap laminate. In my experience as a home‑restoration enthusiast, I’ve learned that original hardwood isn’t just a nostalgic aesthetic—it’s a structural asset, a potential energy saver, and a tangible boost to resale value. Restoring it properly can turn a tired, dark slab into a living piece of history that pays dividends.
Assessing the Condition: The First Inspection
Before you even think about sanding or refinishing, you need a thorough audit of the floor’s health. Grab a flashlight, a moisture meter, and a notepad. Look for these red flags:
- Visible rot or fungal decay. Soft spots that give under pressure indicate moisture intrusion that must be addressed before any surface work.
- Deep gouges or cracks. While surface scratches can be sanded away, deeper gouges may require board replacement.
- Uneven sub‑floor. A warped joist system will cause future movement, leading to squeaks and renewed damage.
- Finish wear. A worn finish can hide underlying imperfections; testing a small area with a solvent will reveal the true state of the wood.
If the assessment uncovers structural issues, tackle those first. That might involve fixing a leaking roof, improving drainage, or installing a vapor barrier. Ignoring the underlying cause is the fastest way to turn a successful restoration into a recurring nightmare.
Choosing the Right Restoration Path
Not every floor calls for a full‑blown refinishing. Based on the assessment, you have three main routes:
- Light sanding + recoating. Ideal for floors with a solid, intact board structure and only surface wear.
- Full sanding + stain + finish. Works when the wood has moderate wear, minor dents, and you want to change the hue.
- Selective board replacement. When you encounter rot or severe cracks, replace only the compromised pieces to preserve as much original material as possible.
Each route carries a cost‑benefit profile. Light sanding preserves more of the original patina, which many buyers prize. Full sanding offers a fresh canvas but may erase subtle historical nuances. Selective replacement keeps authenticity while ensuring safety.
Preparing the Space: Dust, Humidity, and Safety
Preparation is the unsung hero of any successful restoration. Follow these steps:
- Clear the room. Remove furniture, rugs, and any wall hangings that could be damaged by dust.
- Seal off the area. Use heavy‑duty plastic sheeting and negative‑pressure fans to keep dust from infiltrating the rest of the house.
- Control humidity. Aim for a stable 40‑55% relative humidity. Fluctuations can cause wood to expand or contract during sanding, leading to uneven results.
- Personal protection. Wear a respirator with a P100 filter, safety goggles, and hearing protection. Wood dust is a respiratory hazard, and the machinery can be loud.
Tools of the Trade: What You’ll Need
Investing in the right equipment makes the difference between a professional finish and a DIY disaster.
- Drum sander. For large, open areas. Choose a model with adjustable speed and a dust collection system.
- Edge sander. To reach corners and edges that the drum sander can’t touch.
- Random‑orbit sander. Perfect for final passes and spot work.
- Quality abrasives. Start with 36‑grit for the first cut, then progress through 60, 80, and finish with 120‑grit for a smooth surface.
- Stain and finish applicators. Use high‑quality lambswool applicators or a low‑dust pad applicator for even coverage.
The Sanding Process: Step‑by‑Step
Here’s a systematic approach that keeps the wood’s grain happy and minimizes dust:
- First pass with 36‑grit. Move the drum sander slowly, overlapping each pass by at least 25%. This removes old finish and surface imperfections.
- Second pass with 60‑grit. This level smooths out the deep scratches left by the first pass.
- Third pass with 80‑grit. At this stage the surface should feel uniformly smooth to the touch.
- Edge sanding. Use the edge sander with the same grit progression to match the main floor.
- Final pass with 120‑grit. This creates a ready‑to‑stain surface that will accept the finish evenly.
- Vacuum and tack‑cloth. Remove all dust before moving to staining. Any residue will mar the final look.
Pro tip: If you encounter stubborn glue spots or old paint splatter, switch to a hand scraper before sanding that area. This avoids gouging the wood with the power sander.
Staining: Bringing Out the Grain
Staining is where personality enters the equation. Choose a stain that respects the wood’s natural hue while complementing your interior palette. Apply the stain with a lint‑free cloth, working in small sections and wiping excess after 5‑10 minutes. Test the stain on a hidden board first; the color can look dramatically different under varied lighting.
Finishing: Protection Meets Beauty
There are three popular finish types:
- Oil‑based polyurethane. Offers deep amber warmth and high durability, perfect for high‑traffic zones.
- Water‑based polyurethane. Dries faster, stays clear (no amber tint), and emits fewer VOCs—an excellent choice for homes with children or pets.
- Hardwax oil. Penetrates the wood, providing a satin‑like finish that can be refreshed with a simple wipe‑down.
Apply at least three coats, allowing the recommended drying time between each. Lightly sand with 220‑grit sandpaper between coats to ensure adhesion.
Integrating Modern Comforts without Sacrificing Authenticity
Restoration doesn’t have to mean staying stuck in the past. You can embed modern comforts—like radiant heating or smart sensors—while keeping the historic feel. For radiant heating, install electric mats beneath a new sub‑floor that matches the original board thickness. This preserves the floor’s height, preventing door clearance issues.
Smart humidity sensors can be discreetly mounted near the floor to alert you if moisture levels creep up, protecting your newly restored surface. If you want a deeper dive into how smart home tech can complement restoration, check out our guide on future‑ready home hubs. While that article focuses on garages, the principles of integrating technology without compromising design translate perfectly to flooring projects.
Maintenance: Keeping the Restoration Alive
Restoration is an investment; protecting it requires a maintenance plan. Here are three habits that keep hardwood gleaming for decades:
- Regular cleaning. Use a dry microfiber mop to capture dust. For deeper cleaning, a pH‑neutral hardwood cleaner works best.
- Protective pads. Place felt pads under furniture legs to prevent scratches.
- Annual inspection. Look for signs of wear or moisture. Early detection can prevent expensive repairs later.
For a broader perspective on proactive home care, see our article on proactive property care. The concepts of scheduled inspections and preventative measures are directly applicable to hardwood floor upkeep.
Financial Impact: ROI and Market Appeal
Original hardwood floors are a strong selling point. Real‑estate data shows that homes with restored hardwood can command a 5‑10% premium over comparable properties lacking this feature. The return isn’t just monetary; buyers often associate authentic wood with craftsmanship, durability, and a sense of timeless style.
When budgeting, consider both material and labor costs. A full‑house refinishing can range from $3,000 to $8,000 depending on size and condition. However, the increase in home value, reduced heating costs (thanks to the thermal mass of wood), and the intangible benefit of living in a space that honors its past often outweigh the upfront expense.
Case Study: A 1920s Craftsman Revival
Last year I helped a client revive the original oak floors in a 1920s Craftsman bungalow. The floors were covered in worn linoleum and suffered from minor rot in the kitchen area. Here’s what we did:
- Removed the linoleum and assessed each board. Replaced twelve compromised sections with reclaimed oak of matching grain.
- Installed a vapor barrier to address a subtle moisture issue from a nearby bathroom.
- Performed a three‑stage sanding process using a 36‑grit to 120‑grit progression.
- Stained the floor a warm honey tone, echoing the original hue documented in early photographs.
- Finished with a water‑based polyurethane for a clear, durable coat.
- Added a low‑profile radiant heating system beneath the sub‑floor, allowing the homeowner to enjoy warm toes during winter without altering floor height.
The result? A seamless blend of historic authenticity and modern comfort. The homeowner reported a 30% reduction in heating bills during cold months, and when the house later sold, the restored floors were cited as a top feature, contributing to a $15,000 price premium.
Common Pitfalls and How to Avoid Them
- Skipping the moisture test. Even a small leak can cause rot under a beautiful finish. Always test before sanding.
- Using the wrong grit progression. Jumping from 36‑grit straight to 120‑grit leaves deep scratches that become visible after staining.
- Over‑sanding. Removing too much wood can expose the sub‑floor or reduce the floor’s thickness, leading to uneven transitions at doorways.
- Ignoring finish curing time. Rushing the final coat can cause the finish to remain soft, inviting dents and scratches.
- Neglecting edge work. Incomplete edge sanding creates a visible line between the main floor and the trimmed edges.
Bringing It All Together: A Restoration Roadmap
To recap, here’s a concise roadmap you can follow:
- Inspect and diagnose. Identify rot, moisture, and structural issues.
- Plan the restoration path. Choose light sanding, full refinishing, or selective replacement.
- Prepare the environment. Clear, seal, and control humidity.
- Gather tools. Drum sander, edge sander, quality abrasives, applicators.
- Sanding sequence. 36 → 60 → 80 → 120 grit, with vacuuming between steps.
- Stain and finish. Test stain, apply, and coat with three layers of protective finish.
- Integrate modern comforts. Radiant heat, smart sensors, without altering floor height.
- Implement maintenance. Regular cleaning, protective pads, annual checks.
- Measure ROI. Track energy savings and home‑value uplift.
By following this roadmap, you’ll turn a tired, hidden floor into a centerpiece that honors the past while serving today’s lifestyle demands.
Final Thoughts
Original hardwood floors are more than a design trend; they’re a testament to the craftsmanship of an era that valued material integrity. Restoring them is a rewarding blend of detective work, skilled labor, and artistic choice. When done right, you gain a floor that not only looks stunning but also contributes to energy efficiency, durability, and resale value. So next time you walk over a creaky, carpet‑covered space, consider pulling back the layers and giving the wood a chance to shine again.

Paul Gray is a dynamic blogger based in Brampton, where he shares his life with his amazing wife, Sarah. Known for his engaging writing style and relatable insights, Paul has carved out a niche in the blogging world that resonates with readers from all walks of life. When he's not crafting captivating posts, you can find him savoring a cold beer or indulging in the latest blockbuster movie. With a friendly demeanor and a passion for storytelling, Paul brings a unique perspective to his work, making him not just a blogger, but a voice for those who appreciate the simple joys of life.
Related Posts
Breathing New Life into Historic Plaster Walls
Explore how to restore historic plaster walls, retain architectural heritage, and improve home comfo... Read More

Restoring the Soul of Your Home: A Hands‑On Guide to Reviving Architectural Details
Discover a practical roadmap for breathing new life into aging crown molding, baseboards, and orname... Read More

Designing Home Restoration for Multigenerational Living
A fresh take on home restoration focuses on universal design, acoustic comfort, and future‑ready t... Read More
Top Posts
Unlocking Your Home’s Hidden Square Footage: The Ultimate Guide to Attic Conversions
Discover a step‑by‑step guide to converting your attic into a valuable living space, covering structural assessments, permits, budgeting, sustainable design...Read More
Why Modern Gutters Are the Unsung Heroes of Sustainable Home Design
Explore the hidden power of gutters in sustainable living. Learn about eco‑friendly materials, rainwater harvesting, maintenance tricks, and how gutters prote...Read More

The Importance of Foundation Repair in Sustainable Home Restoration
Foundation repair is crucial for sustainable home restoration. Learn how addressing foundation issues can prevent costly damage and ensure the longevity of your...Read More

Designing Sustainable Paving: From Permeable Paths to Smart Surfaces
A fresh look at paving that blends sustainability, design, and smart tech, offering practical steps for durable, climate‑smart outdoor surfaces....Read More
0 Comments
Post Comment
You will need to Login or Register to comment on this post!