
When I first inherited my grandfather’s cottage, I thought the biggest challenge would be the creaky floorboards and the sagging porch. What I didn’t expect was how much of my sanity would hinge on a well‑stocked, intelligently organized repair kit. Over the years, I’ve learned that the difference between a weekend of frustration and a satisfying DIY triumph is often a single missing screw, a misplaced wrench, or the lack of a clear, repeatable process.
Why a Dedicated DIY Repair Kit Matters
Most homeowners treat toolboxes like junk drawers—something you reach for when a problem surfaces, then toss everything back in a haphazard heap. This approach works until you’re mid‑repair, hands greasy, and you can’t find the exact size of Phillips head you need. The result? You either improvise with the wrong tool, risking damage, or you call a professional and pay for a job you could have handled yourself.
Having a purpose‑built kit does three things:
- Reduces downtime. You know exactly where each item lives, so you spend less time hunting and more time fixing.
- Builds confidence. When you’ve prepared for the most common issues, you approach each repair with a calm, methodical mindset.
- Protects your home’s value. Regular, proper maintenance prevents small issues from snowballing into costly, structural problems.
Below, I’ll walk you through the philosophy behind assembling the kit, the essential categories of tools and supplies, and a few “pro‑tips” that have saved me from countless headaches.
The Philosophy: “Preparedness Over Panic”
Think of your repair kit as a first‑aid kit for your house. Just as you wouldn’t embark on a hike without bandages, antiseptic, and a multi‑tool, you shouldn’t tackle a leaky faucet or a jammed door without the right basics at hand. The goal isn’t to have every possible specialty item—no one needs a pipe‑bending machine for a typical suburban home—but to cover the high‑frequency, low‑complexity repairs that most homeowners encounter.
To stay aligned with this philosophy, I categorize my kit into three tiers:
- Core Essentials: Tools you’ll reach for daily or weekly.
- Specialty Sub‑kits: Items for specific systems (plumbing, electrical, carpentry).
- Consumable Stockpile: Materials that run out and need replenishing.
Core Essentials: The Everyday Heroes
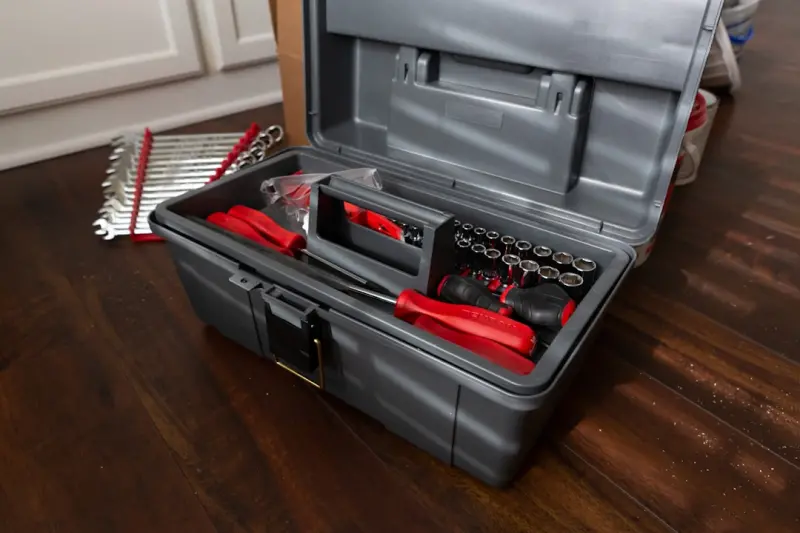
These items should be in a sturdy, portable toolbox you can carry upstairs, into the garage, or out to the garden. I’ve chosen a medium‑size, lockable case with removable trays so I can see everything at a glance.
- Multi‑bit screwdriver set – Includes Phillips, flat‑head, Torx, and square bits in a quick‑change handle.
- Adjustable wrench – A 6‑inch model covers most nuts and bolts you’ll encounter.
- Claw hammer – For driving nails and gently prying without marring surfaces.
- Utility knife – With replaceable blades; ideal for cutting drywall tape, insulation, or packaging.
- Measuring tape (25‑ft.) – For precise cuts and alignment.
- Level (24‑inch) – Ensures shelves, picture frames, and appliances sit true.
- Pliers (needle‑nose and slip‑joint) – Perfect for gripping tight spaces or bending wires.
- Flashlight or headlamp – A bright, LED model with extra batteries for dark crawl spaces.
Even if you’ve never used a level before, it’s worth the investment. A quick glance at the bubble can prevent an entire wall of crooked shelves, saving you time and material.
Specialty Sub‑kits: Targeted Solutions for Specific Systems
Once the core set is in place, layer on focused collections for plumbing, electrical, and carpentry. You don’t need a full‑blown professional toolbox—just the right pieces to address the most common failures.
Plumbing Sub‑kit
- Mini pipe wrench (for PVC and copper)
- Plumber’s tape (Teflon tape) – for sealing threaded connections
- Silicone sealant – a versatile, water‑resistant adhesive for minor gaps
- Drain snake (compact, hand‑operated) – tackles clogs without a plumber’s auger
- Faucet repair kit – includes O‑rings, washers, and a small screwdriver
These items let you handle everything from a dripping kitchen faucet to a clogged bathroom drain. When a leak does appear, the first step is to identify the source quickly before moisture spreads.
Electrical Sub‑kit
- Non‑contact voltage tester – verifies live wires safely.
- Wire stripper/cutter – for cleanly preparing conductors.
- Assorted electrical tape – color‑coded for clarity.
- Set of push‑in wire connectors – eliminates the need for twisting and soldering on simple circuits.
- Spare toggle and rocker switches – handy for replacing faulty wall switches.
Never work on live circuits without turning off the breaker, and always keep a fire‑rated safety mat in the garage when you’re testing outlets.
Carpentry Sub‑kit
- Speed square – for marking straight cuts on lumber.
- Handsaw (15‑inch) – great for quick, precise cuts without a power saw.
- Assorted wood glue – ranging from quick‑set to strong, waterproof formulas.
- Sandpaper block (various grits) – smooths rough edges before painting.
- Finishing nails (1‑inch) and a small nail set – for trim work that won’t split the wood.
Even if you’re not building a deck, these tools let you repair a loose stair tread or replace a cracked baseboard with confidence.
Consumable Stockpile: Keep It Fresh
Tools are useless without the right materials. Rotate these items regularly—once you use a roll of sandpaper, replace it; when a tube of silicone sealant is half‑used, buy a fresh one.
- Assorted screws (wood, drywall, sheet metal)
- Wall anchors (plastic and metal) for hanging heavy items.
- Caulking gun + tubes of acrylic and silicone caulk.
- Drywall joint compound – a small bucket for patching holes.
- Paint touch‑up kit – a few shades of universal primer and paint.
- Gloves (nitrile) – protect your hands from chemicals and sharp edges.
- Dust masks – essential when sanding or cutting.
Organizing the Kit: The “Zone” Method
My toolbox is divided into three “zones,” each with a clear label:
- Zone A – Tools: All hand tools, from screwdrivers to hammers.
- Zone B – Materials: Consumables, like tapes, sealants, and fasteners.
- Zone C – Reference: A pocket‑size notebook, a printed maintenance checklist, and safety guidelines.
This system cuts the time spent rummaging by half. Whenever I finish a repair, I return items to their zone, wipe them clean, and check the consumable inventory. It’s a habit that feels almost ritualistic, but the payoff is a toolbox that never surprises you with missing pieces.
Real‑World Scenarios: How the Kit Saves the Day
Below are three typical DIY moments where a well‑curated kit makes all the difference.
1. The Leaky Showerhead
Step 1: Turn off the water supply at the valve.
Step 2: Use the adjustable wrench to loosen the shower arm. If the threads are corroded, wrap a few turns of plumber’s tape around them before re‑threading.
Step 3: Replace the worn‑out washer from the faucet repair kit. Re‑assemble, turn the water back on, and test for drips.
All of this can be done in under 15 minutes with the core essentials and plumbing sub‑kit. No need for a plumber’s invoice.
2. A Flickering Light Switch
First, pull the switch cover with a flat‑head screwdriver, then use a non‑contact voltage tester to confirm the circuit is dead. Replace the old switch with a new one from the electrical sub‑kit. Snap the wires into the push‑in connectors, secure the switch, and restore power. The whole job takes about ten minutes.
3. Cracked Baseboard
Using the handsaw, cut a clean replacement piece of trim. Apply wood glue and a few finishing nails, then fill any gaps with wood filler. Sand smooth with the sandpaper block, and touch up with paint from the consumable stockpile. This repair restores the room’s aesthetic and prevents drafts.
Maintaining the Kit Itself
A kit is only as good as its upkeep. Schedule a quarterly “kit audit” where you:
- Inspect each tool for rust, wear, or missing parts.
- Replace any depleted consumables.
- Re‑label zones if you’ve added new items.
- Test the flashlight batteries and replace them if dim.
During my audits, I discovered a cracked handle on my hammer—an easy fix with a new handle kit, but if left unchecked it could have led to a mishap.
Beyond the Toolbox: Leveraging Community Knowledge
While a personal kit empowers you, never underestimate the value of shared knowledge. Local hardware store workshops, online forums, and neighborhood DIY groups can introduce you to tricks you’d never think of on your own. For example, a neighbor once taught me a clever method for sealing gaps around baseboard heaters using a thin bead of silicone—something I later added to my kit’s consumable list.
Moreover, many modern home‑repair resources now incorporate data‑driven insights. Platforms that aggregate repair histories can point out which issues are most common in your area, allowing you to tailor your kit accordingly. It’s a simple way to stay ahead of the curve without over‑stocking.
Final Thoughts: The Confidence Dividend
Investing time in building and maintaining a purposeful DIY repair kit pays dividends in both savings and peace of mind. It transforms the homeowner from a reactive fire‑fighter to a proactive caretaker. The next time a faucet drips, a switch flickers, or a board cracks, you’ll reach for your toolbox, not your phone.
Remember, the goal isn’t to become a full‑blown contractor—just to have enough competence and resources to address the everyday hiccups that inevitably arise. Your home is a living system; treat it with the same level of preparedness you’d give any valuable asset, and it will reward you with durability, comfort, and a sense of ownership you can’t buy.

David MacKinnon is a dynamic freelance writer known for his captivating storytelling and keen insights into the world of technology. With a passion for exploring the intersection of innovation and everyday life, he crafts engaging narratives that not only inform but also inspire his readers.
Related Posts
Embracing Sustainable DIY Home Repairs for a Greener Tomorrow
Make a positive impact on the environment by embracing sustainable DIY home repairs. Learn how to ch... Read More
Build a Portable DIY Home Repair Kit That Saves Time and Money
A hands‑on guide to creating a portable DIY repair kit, packed with the right tools, smart organiz... Read More

The Repair Calendar Method: Turning Small Fixes into Big Savings
Learn the step‑by‑step approach to building a DIY repair calendar, from zoning your home and cho... Read More
Top Posts

Rethinking Roofs: From Passive Shield to Active Asset
This article reveals how modern roofing can evolve from a static cover into a data‑driven, climate‑smart, and modular platform that boosts sustainability, s...Read More

Paving the Way: How Modern Surfaces Transform Outdoor Living
Explore fresh paving trends that combine eco‑friendly materials, smart tech, and artistic patterns to turn ordinary walkways into sustainable, eye‑catching ...Read More

From Shingles to Data Hubs: Reimagining Roofs for the Modern Facility
Explore a fresh perspective on roofing that treats the roof as an intelligent platform, leveraging drones, sensors, and integrated solar to transform a passive ...Read More

Designing Window Treatments That Shape Light, Mood, and Comfort
Explore the art of layering, fabric selection, color psychology, and hardware choices to create window treatments that control light, boost acoustics, and perso...Read More
0 Comments
Post Comment
You will need to Login or Register to comment on this post!