
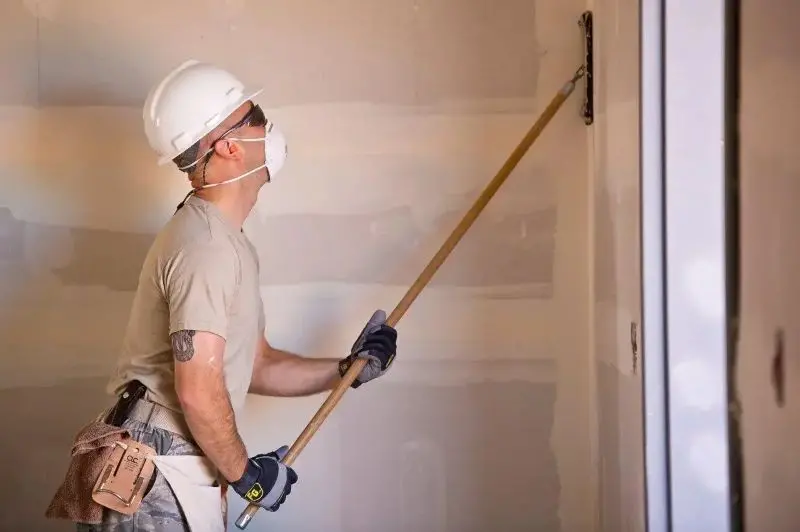
Why Drywall Deserves a Craftsman’s Respect
When I first picked up a drywall knife, I realized that this humble panel is the unsung hero of every interior – it hides the chaos of wiring, insulation, and structural quirks while providing the canvas for a home’s aesthetic expression. Mastering drywall isn’t just about slapping sheets on walls; it’s a disciplined dance of measurement, material science, and a dash of patience that separates a DIY patch job from a professional finish that lasts generations.
Strategic Planning and Precise Layout
The foundation of flawless drywall begins long before the first sheet is lifted, with meticulous planning that maps out stud locations, electrical boxes, and any irregular openings that will disrupt a clean run of panels. I always start by marking stud centers on the floor and ceiling, then double‑checking with a laser level to ensure my grid aligns perfectly, because even a half‑inch deviation will ripple into visible seams and uneven surfaces later on.
Selecting the Perfect Board for Every Space
Not all gypsum boards are created equal; choosing the right type for each room can save you from future headaches and boost performance. In damp areas like bathrooms and basements I reach for moisture‑resistant greenboard, while living rooms benefit from standard ½‑inch panels that balance weight and workability, and high‑traffic corridors sometimes earn a thicker, impact‑resistant board to withstand the wear and tear of daily life.
Cutting, Shaping, and Staying Safe
Precision cutting is where the art meets the science; a sharp utility knife, a straight edge, and a reliable T‑square become extensions of your hands, allowing you to score and snap panels with clean lines that fit around windows, doors, and electrical boxes. Safety is non‑negotiable, so I always wear a dust mask, safety glasses, and gloves, because the fine gypsum dust not only irritates lungs but also settles into seams, sabotaging the smoothness of the final coat.
Hanging Techniques That Eliminate Future Drama
Whether you prefer screws or nails, the key is consistent embedment depth and staggered joint placement to prevent the dreaded “popping” that occurs when panels shift with temperature changes. I drive screws every 12 inches on walls and every 16 inches on ceilings, using a drywall gun that feeds quickly yet allows me to feel the resistance, ensuring each fastener bites into the stud without over‑driving and weakening the board.
Taping, Muddying, and Building Seamless Layers
The three‑coat mudding system is my secret weapon: a thin first coat (the “tap” coat) that embeds paper or mesh tape, a second “fill” coat that smooths the joint, and a final “finish” coat that blends the entire surface into a uniform plane. Patience during each drying stage pays off; I lightly mist the surface before the second coat to extend workability, and I always feather the edges to avoid the telltale ridge that betrays amateur work.
Sanding, Dust Control, and Achieving a Flawless Finish
Sanding is where the magic becomes visible, but it also creates the most mess, so I seal the room with plastic sheeting, use a vacuum‑mounted sander, and wear a respirator to keep airborne particles at bay. A fine‑grit (220) sanding pad smooths out any remaining ridges, and I finish with a light dust‑wipe using a tack cloth, revealing a surface so even the most critical eye will struggle to spot a flaw.
Integrating Acoustics and Flooring for a Cohesive Whole
Drywall isn’t just a visual element; it’s a crucial part of a home’s acoustic envelope, especially when paired with thoughtful flooring choices. By installing resilient channels and using Acoustic Design principles, you can dramatically reduce sound transmission between rooms, creating a quieter, more comfortable environment. Pair this with the right underlayment and flooring selection – insights you’ll find in Flooring Fundamentals – and you achieve a harmonious blend where the walls absorb, the floor cushions, and the overall structure feels solid yet serene.
Maintenance, Repairs, and Future‑Proofing Your Walls
Even the best drywall work will encounter dents, nail pops, or moisture stains over time, so keeping a small repair kit on hand – consisting of a patch piece, joint compound, and a putty knife – empowers you to address issues before they spread. When planning upgrades, consider adding insulation behind the panels for energy efficiency or installing fire‑rated board in kitchens to meet code requirements, ensuring that today’s investment continues to protect and beautify your home for years to come.

Craig Brett is a freelancer with a passion for the outdoors. His love for nature inspires his work, bringing authentic and engaging perspectives to projects related to outdoor activities, adventure, and environmental topics.
Related Posts
The Art of Drywalling: A Comprehensive Guide
Drywalling is a crucial step in construction and renovation, providing a smooth surface for painting... Read More

The Evolution of Sustainable Drywalling: A Comprehensive Guide
Sustainable drywalling involves the use of eco-friendly materials, techniques, and practices that mi... Read More

Beyond the Sheet: Unlocking the Full Potential of Modern Drywall
Explore how today’s drywall goes beyond simple partitioning, offering acoustic mastery, fire resis... Read More
Top Posts
The Hidden Power of Paint: Health, Tech, and Sustainable Upgrades
Explore how modern paint technologies—low‑VOC formulas, AI color selection, scented and smart coatings—can transform your home’s health, sustainability,...Read More

How Sunrooms Can Supercharge Employee Well‑Being and Reduce Energy Costs
A sunroom isn’t just a bright extra room; it’s a strategic wellness hub that lowers energy use, enhances employee well‑being, and drives measurable ROI fo...Read More
Sustainable Window Treatments: Style Meets Eco‑Efficiency
Explore the art of eco‑friendly window treatments that blend design, smart tech, and sustainability to cut energy costs and elevate your home’s appeal....Read More
Mold Removal Reinvented: IoT‑Driven Proactive Strategies
A data‑first approach to mold removal uses sensor networks, automated alerts, and envelope upgrades to detect moisture early, reduce remediation costs, and im...Read More
0 Comments
Post Comment
You will need to Login or Register to comment on this post!